Changing your home alarm battery is a simple maintenance task that keeps your security system running smoothly during power outages, typically requiring just a screwdriver and about 15 minutes of your time. We’re going to walk you through every step of replacing both your main control panel battery and those tiny batteries in your door sensors, so you can keep your family safe without calling in a technician.
Think of your security system’s backup battery like a spare tire – you hope you never need it, but when the power goes out at 2 AM, you’ll be grateful it’s there doing its job. Most of us don’t think about our alarm batteries until that annoying beeping starts or we see “LOW BATTERY” flashing on the keypad. The good news? Swapping out these batteries is way easier than you might think, and we’re about to show you exactly how to do it safely. If you are reading to find out how to change the battery on your home security system, you are at the right place for a proper DIY guide.
Key Takeaways:
- Main panel batteries last 3-5 years and cost between $15-$40 depending on size (4Ah or 7Ah capacity)
- Always unplug the transformer first before touching anything inside your control panel to avoid electrical damage
- Sensor batteries typically last 2-3 years and use common coin cells (CR2032) or lithium batteries (CR123A)
- Wait 24-48 hours after replacement for the new battery to fully charge and clear warning messages
- Match your battery specs exactly – wrong voltage or size can damage your entire security system
- Test everything after installation by triggering sensors and checking the keypad display

Understanding Your Home Security System Battery Setup
Our home alarm systems rely on two separate battery types working together to protect our homes. The main control panel houses a large rechargeable battery (usually 12 volts) that keeps the brain of our system running when the power cuts out. Meanwhile, wireless sensors scattered throughout our house – on doors, windows, and walls – contain their own smaller batteries that let them communicate with the main panel without any wires.
The control panel battery looks like a small car battery, measuring roughly 7 inches long by 3-4 inches tall. These sealed lead-acid batteries recharge automatically whenever your system has power, silently sitting in the panel box doing nothing until that storm knocks out your electricity. Then they kick in instantly, keeping your security system armed and monitoring for intruders even when everything else in your house goes dark.
Why Regular Battery Replacement Matters
We can’t stress this enough – waiting until your battery completely dies puts your home at risk. A worn-out backup battery might show 12 volts on a meter but can’t deliver the current needed during an actual power outage. We’ve seen too many folks discover their “working” alarm system was actually defenseless during a storm because they ignored those low battery warnings for months.
Fresh batteries ensure our security system stays online during emergencies, which is exactly when we need protection most. Burglars know that power outages create opportunities, and a dead backup battery turns your expensive alarm system into an elaborate paperweight. Replacing batteries every 3-5 years costs way less than dealing with a break-in.
Recognizing When Your Alarm Battery Needs Replacement
Our alarm systems are pretty smart about telling us when they need help. The control panel constantly monitors battery voltage and will alert us through several obvious signs before things get critical. We need to pay attention to these warnings instead of just hitting buttons to silence them.
Common Warning Signs and Symptoms
The most obvious alert comes right on our keypad display. We’ll see messages like “BAT,” “LO BAT,” “LOW BATTERY,” or “SYSTEM TROUBLE” lighting up the screen. Some systems show a little battery icon with an X through it or a trouble light that stays lit. These aren’t suggestions – they’re our system crying out for help.
Beeping noises are another dead giveaway. Our panel might chirp once every hour, or it could beep more frequently as the battery gets weaker. This beeping happens even when the system is disarmed because it’s a maintenance alert, not a security alarm. We’ve talked to neighbors who tried to ignore these beeps for weeks – trust us, just change the battery and save your sanity.
False alarms throughout our home can also point to battery problems. When the backup battery can’t maintain steady power, sensors might misfire or the panel might think it lost communication with devices. If we’re getting random zone alerts or the system is acting wonky without any real cause, the battery could be the culprit.
The 24-Hour Rule After Power Outages
Here’s a pro tip that’ll save you some money: after a blackout, give your battery a full day to recharge before assuming it’s toast. Modern alarm batteries can bounce back from a deep discharge if we just let them charge up properly. The transformer needs time to pump energy back into that battery, and we need patience to let it work.
What We’ll Need for Battery Replacement
Getting organized before we start makes this job go smoothly. We don’t need a toolbox full of fancy equipment – just a few basic items that most of us already have lying around the house. Grabbing everything beforehand means we won’t be running around looking for a screwdriver while our alarm panel sits open.
Essential Tools and Materials
Our main tool is a Phillips head screwdriver, which opens most alarm panel covers. Some older systems use flat-head screws or even keyed locks that need a special panel key (usually comes with the system or hangs near the panel). We’ll also need our alarm code ready to disarm the system and clear warnings after we’re done.
The replacement battery itself is obviously crucial. We need to match the exact specifications of our old battery – typically 12V 4Ah or 12V 7Ah for main panels. The 7Ah size is most common and measures about 6 inches wide, 3.75 inches tall, and 2.5 inches deep. Bringing our old battery to the store ensures we get the right replacement.
| Battery Type | Common Voltage | Capacity | Typical Dimensions | Average Cost |
|---|---|---|---|---|
| Main Panel (Small) | 12V | 4Ah | 4″H x 3.5″W x 2.75″D | $15-$25 |
| Main Panel (Standard) | 12V | 7Ah | 3.75″H x 6″W x 2.5″D | $20-$40 |
| Door/Window Sensor | 3V | CR2032 | Coin cell | $2-$5 |
| Motion Detector | 3V | CR123A | Cylindrical | $3-$8 |
| Wireless Keypad | 1.5V | AA or AAA | Standard | $5-$10 |
Step-by-Step: Replacing Our Main Control Panel Battery
Now we’re getting into the meat of the project. Changing our panel battery follows a logical sequence that keeps us safe and protects our expensive control board. We’re going to walk through each step carefully because one mistake – like reversing polarity – can fry the whole system.
Step 1: Safely Powering Down the System
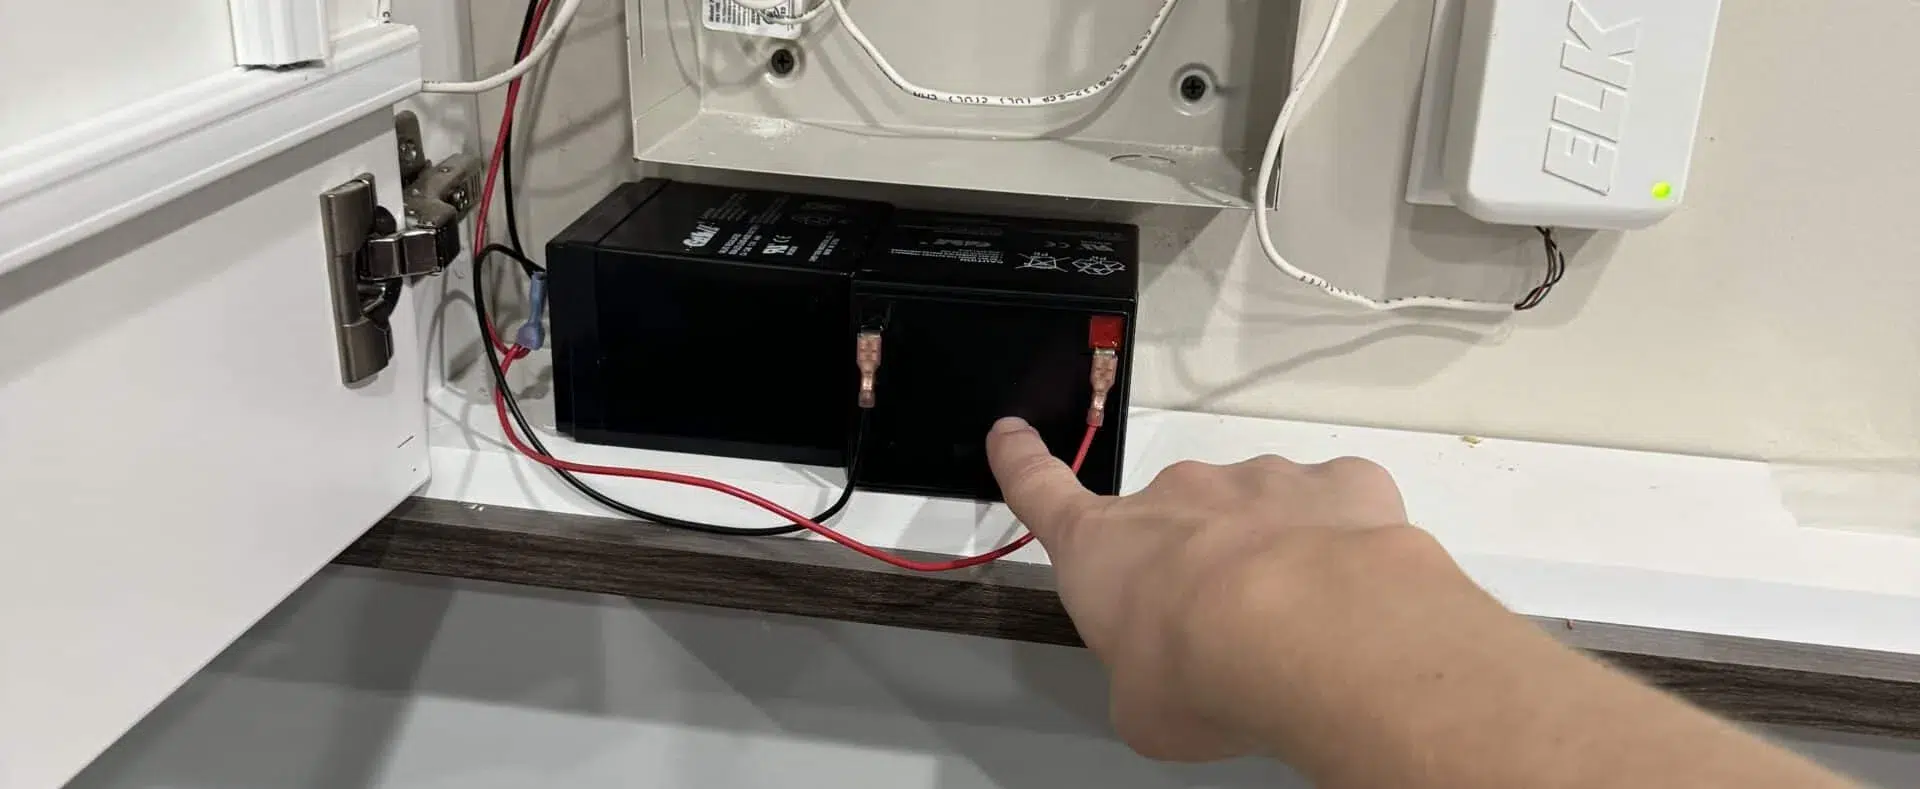
Before we touch anything inside that metal box, we need to cut the main power. We find the transformer – that chunky black plug adapter connected to our security panel, usually plugged into an outlet below the panel or in a nearby closet. We simply unplug this transformer from the wall.
Don’t panic when we unplug it. Our backup battery immediately takes over, keeping the system armed and functioning normally. This switchover is seamless and won’t trigger any alarms or alerts. We’re unplugging the transformer to protect ourselves from electrical shocks and to prevent any power surges from damaging the control board when we disconnect the battery.

Step 2: Opening the Panel and Locating the Battery
Most alarm panels open like a medicine cabinet – either swinging on hinges or lifting off after we remove a few screws. We look for screws along the sides or bottom of the panel cover and remove them with our screwdriver. Some panels have a simple latch system where we push or lift to release the cover.
Inside, our battery sits in the bottom section of the panel, usually in its own compartment or held down by a metal bracket. The battery can’t be missed – it’s by far the largest component in there, connected to the circuit board with two thick wires (red and black) that attach to terminals on top.
Step 3: Disconnecting the Old Battery
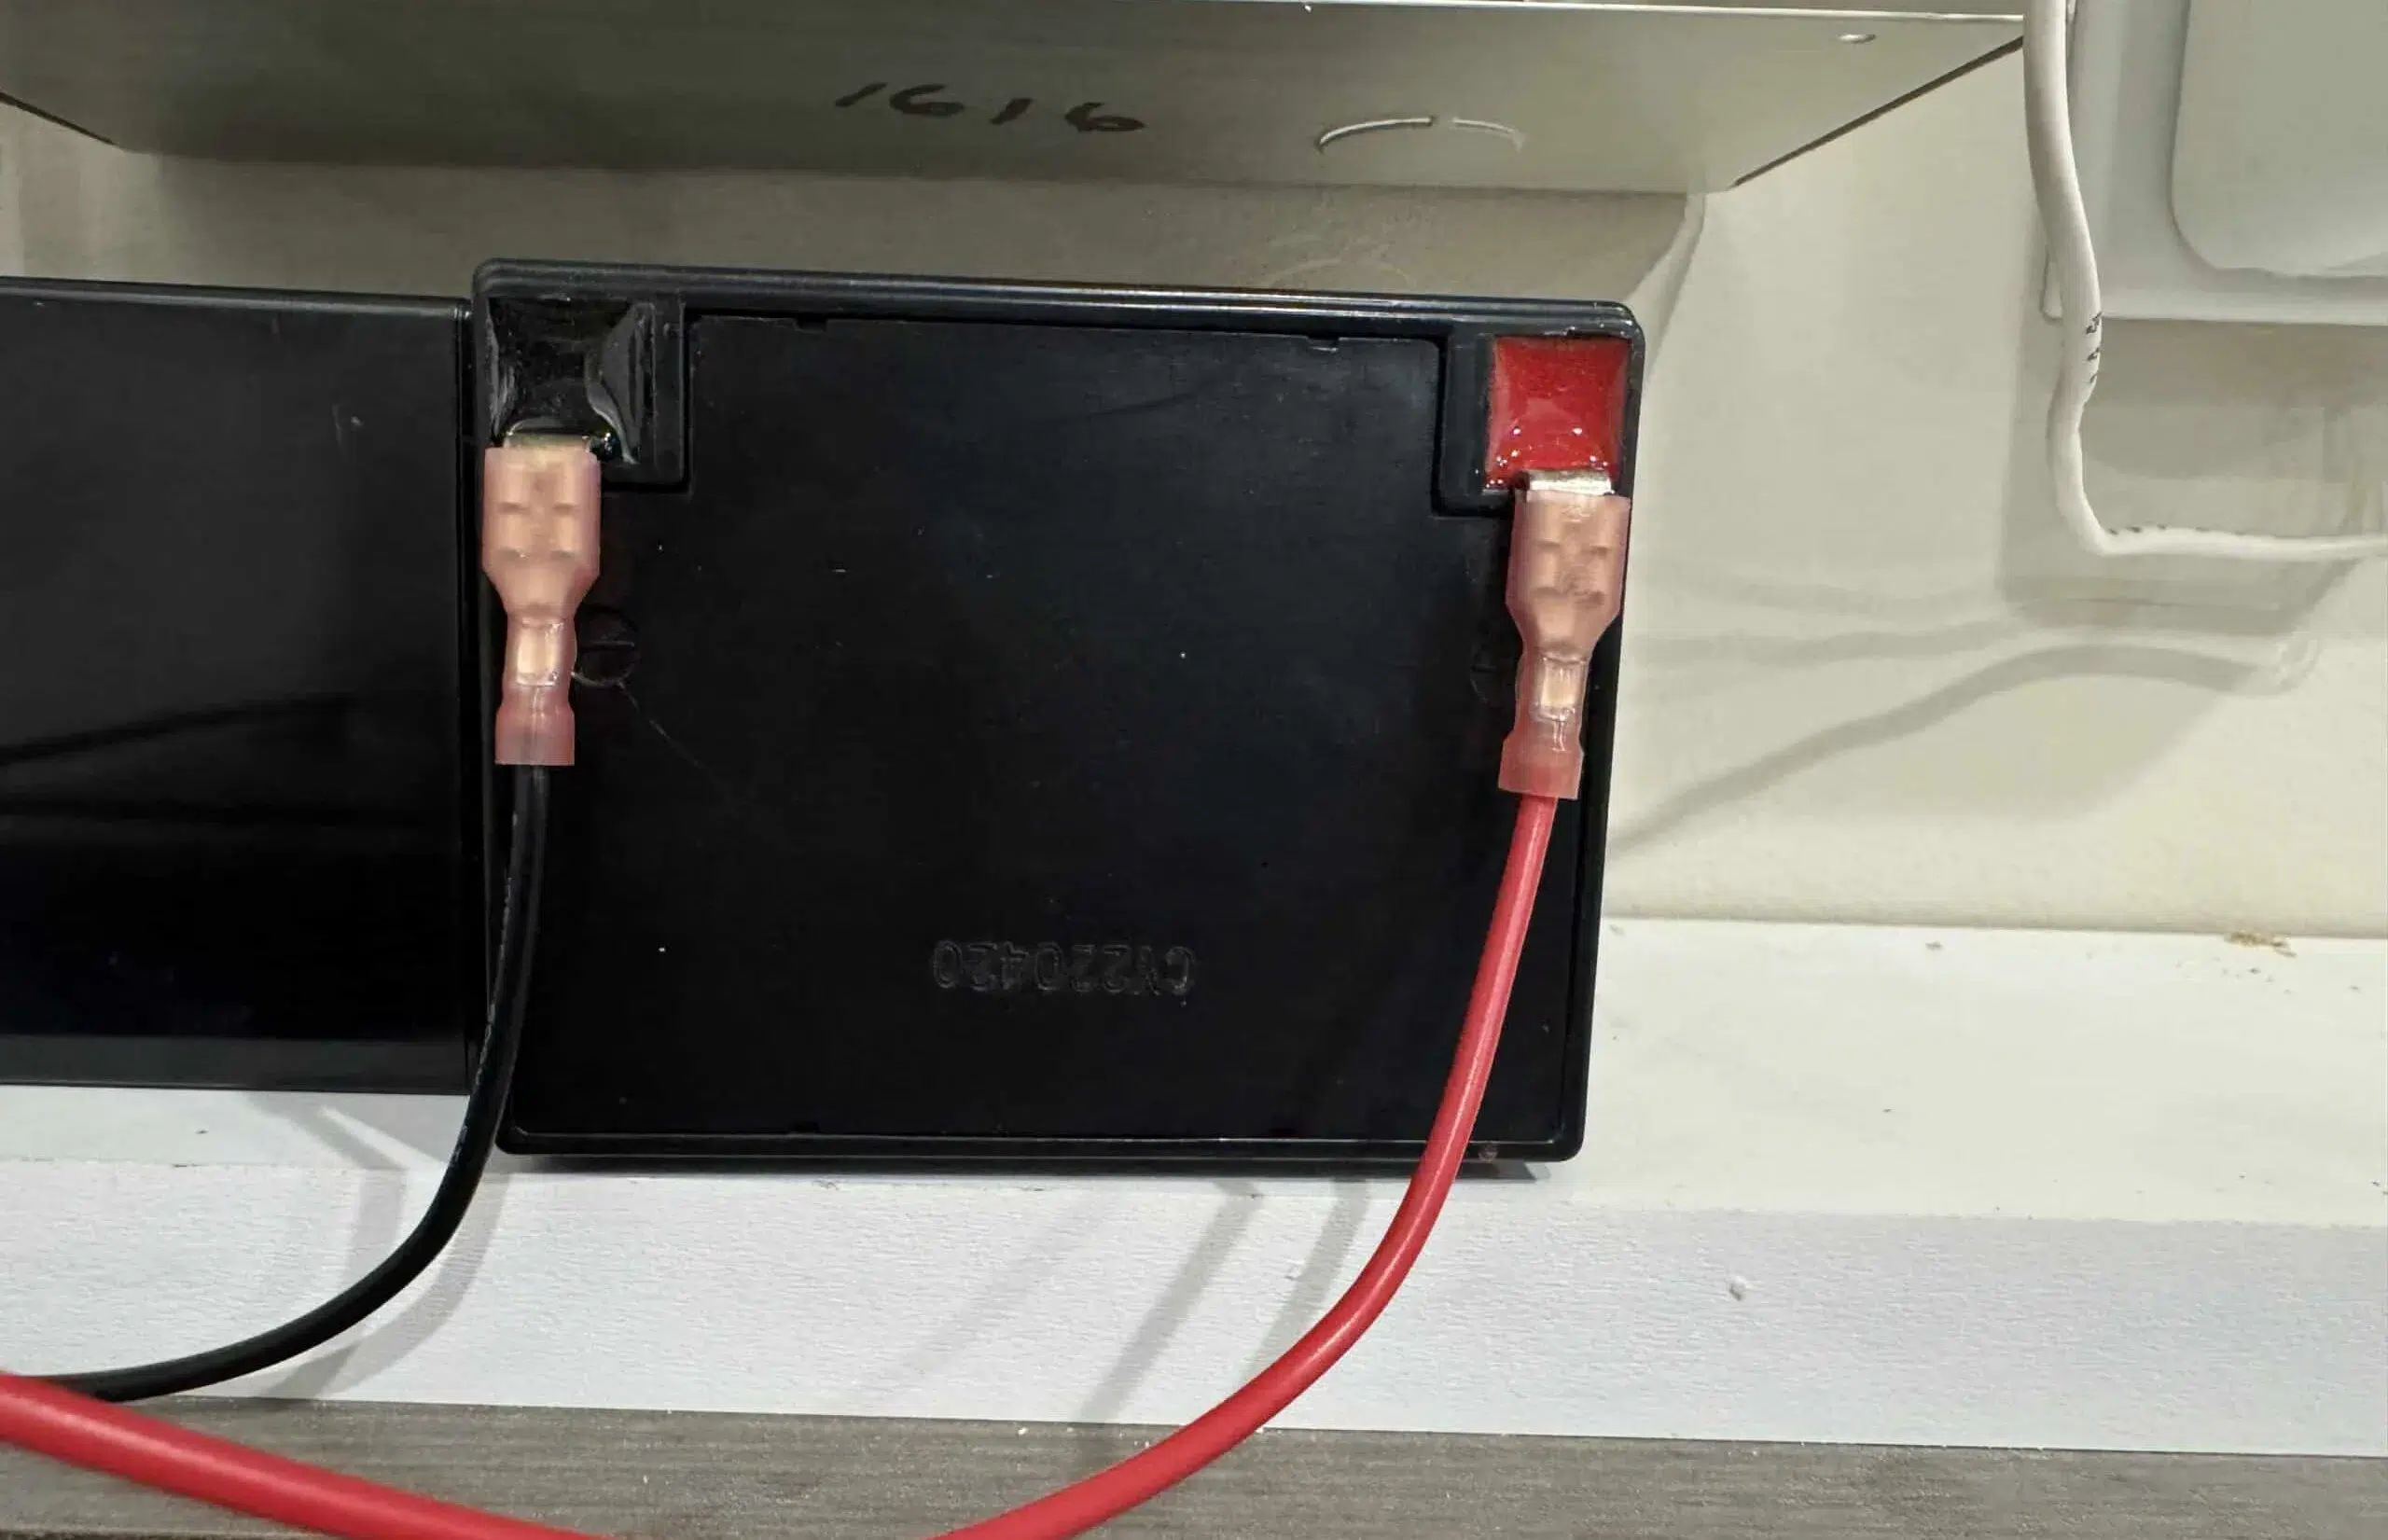
We grab those red and black wires close to where they connect to the battery terminals and pull straight off. These are spade connectors that slide on and off easily – no tools needed. Unlike car batteries where order matters, we can remove these wires in any sequence without causing problems.
If the connectors feel stuck, we wiggle them gently side to side while pulling. We never yank on the wires themselves because that could tear them loose from the control board. The connections should release with modest pressure. Once both wires are off, we can lift the old battery out of its compartment.
Step 4: Installing the Fresh Battery
We position our new battery in the same spot where the old one lived, making sure it sits flat and stable in the compartment. The terminals on top should face the same direction as our old battery to make connecting the wires easier.
Now for the critical part: we match wire colors to terminal colors. Red wire connects to the red terminal marked with a plus (+) sign. Black wire connects to the black terminal marked with a minus (-) sign. These connections should slide on firmly and feel snug. Getting this backwards will damage our control board, so we double-check before moving forward.
Step 5: Restoring Power and Testing
We plug that transformer back into the wall outlet, bringing main power back to our security system. The panel lights up, and we should see normal operation within seconds. Any low battery warnings won’t disappear immediately – that’s normal and expected.
Our transformer now begins charging the new battery, which takes 24-48 hours to reach full capacity. During this charging period, our system works perfectly fine and provides full protection. We just need to be patient and let the chemistry do its thing inside that battery.
Clearing Stubborn Low Battery Warnings
Sometimes our panel keeps showing low battery alerts even after we’ve installed a fresh battery. This frustrates a lot of folks, but it’s actually normal behavior. Our system needs time to verify the new battery is good and to charge it up enough to register as healthy.
Understanding the Charging Process
Brand new batteries ship partially discharged because storing them fully charged degrades the cells. Our system needs 6-12 hours minimum to put enough charge into the battery to clear the warning. Some batteries take the full 48 hours, especially if they were sitting in a warehouse for months.
We can try entering our alarm code twice on the keypad to manually clear the alert once the battery has charged for several hours. This tells the system to re-check battery status instead of displaying the old warning. If the battery truly has enough charge, the warning disappears.
Power Cycling for Persistent Errors
When nothing else works, we can force our system to completely reset by power cycling it. We unplug the transformer, disconnect both battery wires, and wait a full minute. Then we reconnect the battery first, wait a few seconds, and plug the transformer back in. The system reboots fresh and re-evaluates all sensors and batteries.
Fair warning: power cycling triggers a “loss of clock” error on DSC systems because the panel forgets what time it is. We’ll need to reset the clock manually unless we have alarm.com service, which automatically syncs the time. This minor annoyance is worth it to clear stuck error codes.
Replacing Batteries in Wireless Sensors
When our keypad shows a low battery warning with a zone number attached (like “Zone 3 Low Battery”), it’s not talking about the main panel battery. One of our wireless sensors – a door contact, window sensor, or motion detector – needs its battery replaced. These sensors use much smaller batteries than the control panel.
Identifying Which Sensor Needs Help
Our keypad tells us exactly which zone has the low battery, but we might need to check our system manual or zone list to figure out which physical sensor that corresponds to. Zone 3 might be “Front Door” or “Master Bedroom Window” depending on how our installer set things up. Once we know which sensor, we can track it down.
Door and window sensors are usually small plastic boxes attached to the door frame and door itself, about the size of a lighter. Motion detectors are larger triangular or rectangular devices mounted in room corners. Each type uses different battery sizes, so we need to identify the sensor before buying replacements.
Common Sensor Battery Types
Most door and window sensors use CR2032 coin batteries – those flat, round silver batteries that look like oversized watch batteries. These typically last 2-3 years depending on how often the door opens. Some newer sensors use CR123A lithium batteries, which are cylindrical and about the size of our thumb.
Motion detectors usually run on CR123A lithium batteries as well, sometimes two of them depending on the model. Wireless keypads are the easiest – they take standard AA or AAA batteries just like our TV remote. We can grab these at any grocery store or pharmacy.
The Sensor Battery Replacement Process
We start by disarming our system completely to prevent tamper alerts. Most sensors will scream bloody murder if we pry them open while the system is armed because they think someone’s messing with them. Once disarmed, we use a flathead screwdriver to gently pop open the sensor cover at the notch or tab.
Inside, we find the battery sitting in a little holder. Before touching anything, we look carefully at how the battery is oriented – which end faces up, how the positive and negative terminals align. We can even take a quick phone picture to remember. Then we pop out the old battery and slide in the new one, matching that exact same orientation.
The cover snaps back into place with a satisfying click. Now we test the sensor by opening and closing the door or window 3-4 times, or walking in front of the motion detector. Our keypad should show those zone numbers lighting up as the sensor communicates with the panel, proving everything works properly.
Where to Buy Replacement Batteries
We have plenty of options for scoring replacement batteries without paying installer prices. The key is knowing our exact battery specifications before we shop so we don’t waste time returning the wrong size.
Local Shopping Options
Battery specialty stores like Batteries Plus Bulb stock every alarm battery imaginable and employ staff who can help us match specifications. We can walk in with our old battery and they’ll find the perfect replacement on the spot. Hardware stores like Home Depot and Lowe’s carry common alarm batteries in their security system sections, usually near the smoke detectors.
Local alarm companies also sell replacement batteries, though they might charge a premium hoping we’ll pay for installation too. There’s nothing wrong with buying from them if we want to support local business, but we’ll definitely pay more than buying online or at a big box store.
Online Purchasing Considerations
Amazon offers the best prices on alarm batteries, often 30-40% cheaper than local stores. We can read reviews from other customers who bought the same battery for their system, which helps confirm we’re getting the right one. The downside is waiting for shipping, which doesn’t help if our system is beeping at us right now.
When buying online, we need to verify the seller is reputable and check the manufacturing date if possible. Batteries degrade sitting on shelves, so we want the freshest stock available. Customer reviews usually mention if batteries arrived old or defective.
Critical Safety Reminders and Best Practices
Working with alarm batteries is generally safe, but we can cause expensive damage if we’re careless. Following a few simple safety rules protects both us and our security system investment.
Matching Battery Specifications Exactly
We absolutely must match the voltage and amp-hour rating of our original battery. Installing a 12V 4Ah battery where a 12V 7Ah battery should go might seem fine (same voltage, right?), but the smaller battery can’t provide enough backup time and might not charge properly. The control board expects a certain battery capacity and adjusts its charging accordingly.
Going the other direction – installing a larger amp-hour battery than specified – seems like it would give us more backup time. Sometimes it works fine, but other times the control board’s charging circuit can’t properly charge the larger battery, leaving us worse off than before. Stick with what the manufacturer recommends.
Polarity Is Everything
Reversing polarity is the fastest way to destroy our control panel. Red wire goes to positive (+) terminal, black wire goes to negative (-) terminal, every single time without exception. When we hook it up backwards, we send electricity flowing through circuits in the wrong direction, instantly frying delicate components.
The damage from reversed polarity is permanent and usually kills the entire control board, requiring complete panel replacement. We’re talking hundreds of dollars to fix a mistake that takes two seconds to make. We check twice, connect once, and never rush this step.
Proper Battery Disposal
Old alarm batteries are full of lead and acid that can’t just go in the trash. Most battery retailers accept old batteries for recycling when we buy a new one. Auto parts stores also take sealed lead-acid batteries since they’re similar to car batteries. Some municipalities have hazardous waste collection days where we can drop off old batteries for free.
Recycling these batteries recovers the lead for reuse and safely handles the acid, keeping toxic materials out of landfills. It’s the right thing to do, and in many places it’s actually required by law. We hold onto our old battery after replacement and make a plan to recycle it properly.
Troubleshooting Common Battery Replacement Issues
Sometimes we do everything right and still run into problems. Before calling a technician and paying a service fee, we can troubleshoot a few common issues ourselves.
Battery Won’t Hold a Charge
If we install a new battery and it shows low voltage again within days, we might have a defective battery or a problem with the charging circuit. We first verify the transformer is plugged in and working – check if the small LED light on it is illuminated. No light means no charging.
Assuming the transformer works, the charging circuit on our control board might be toast. This sometimes happens in older systems where components wear out. Unfortunately, a bad charging circuit requires professional repair or panel replacement. We can verify the battery itself is good by testing it with a multimeter – should read around 12.5-13 volts when fully charged.
System Acting Strange After Battery Change
If our alarm starts randomly beeping, showing weird errors, or sensors stop working after we replace the battery, we probably jostled something inside the panel. We open it back up and check that all wire connections are secure. Sometimes opening the panel loosens other wires besides the battery connections.
We also make sure we didn’t accidentally touch any circuit board components or knock any wires loose while swapping batteries. These control boards are relatively fragile, and a static discharge from our body can damage chips. Touching the metal panel box before reaching inside helps discharge any static electricity.
Zone Numbers Showing After Main Battery Replacement
This confuses people all the time. We replace the big panel battery, but our keypad still shows “Zone 5 Low Battery” or similar. That’s because the main panel battery and sensor batteries are completely separate. The panel battery replacement doesn’t fix low sensor batteries – we need to track down that specific sensor and change its battery too.
Maximizing Battery Life and System Performance
Beyond just replacing batteries when they die, we can take steps to extend battery life and keep our security system running optimally for years.
Environmental Factors Affecting Battery Life
Extreme temperatures kill batteries faster than anything else. Alarm panels mounted in unconditioned garages or attics face temperature swings that degrade battery chemistry. Ideal operating temperature is 50-80°F. If our panel lives somewhere that gets super hot in summer or freezing in winter, expect to replace batteries more frequently.
Humidity also impacts battery life, though sealed lead-acid batteries handle moisture better than other types. We avoid mounting panels in damp basements or near water heaters where condensation might form. Keeping the panel in a climate-controlled area of our house extends battery life significantly.
Regular System Testing
We should test our alarm system monthly by triggering sensors and verifying the panel responds correctly. This helps us catch dying batteries before they completely fail. Most panels have a test mode that walks us through checking each zone without actually calling the monitoring station.
Testing our backup battery means unplugging the transformer and making sure the system stays powered up. We let it run on battery for 30 minutes or so, then plug the transformer back in. If the panel dies quickly during this test, even with a “good” battery, it’s time for replacement before we actually lose power during a storm.
Monitoring Service Alerts
If we have professional monitoring, the monitoring station receives the same low battery alerts our keypad shows. Many services proactively call or email us when they detect problems, giving us early warning before batteries die completely. We shouldn’t ignore these notifications – they’re catching issues we might miss.
Frequently Asked Questions
How often should we replace our home alarm battery?
We should replace our main control panel battery every 3-5 years regardless of whether it’s showing problems, as these sealed lead-acid batteries naturally degrade over time and lose their ability to hold a charge even when they appear to work fine. Sensor batteries in wireless devices typically last 2-3 years depending on how frequently the sensor activates, and we should replace them when low battery warnings appear rather than on a schedule.
Can we replace our alarm battery ourselves or do we need a technician?
We can absolutely replace our alarm battery ourselves using just a screwdriver and following the proper power-down procedures outlined in this guide, saving the $75-150 that technicians typically charge for this simple 15-minute task. The only situations requiring professional help are if we’re uncomfortable working with electrical devices, if the battery replacement doesn’t solve the problem indicating a deeper issue, or if our system is still under warranty where self-service might void coverage.
What happens if our alarm battery dies completely?
If our backup battery dies completely, our security system will continue working normally as long as we have main power from the wall outlet, but the moment we lose electricity during a storm or outage, our entire alarm system shuts down and provides zero protection until power returns. This vulnerability is exactly why maintaining a healthy backup battery is so critical – we need that protection most during emergencies when power is out.
Why does our keypad still show low battery after we replaced it?
Our keypad continues showing low battery warnings after replacement because new batteries arrive partially discharged and need 6-48 hours of charging time before the system recognizes them as healthy, and we can speed this up by entering our alarm code twice to force the panel to recheck battery status. If the warning persists beyond 48 hours of charging, we might have a defective battery or a problem with the panel’s charging circuit that requires further investigation.
What’s the difference between 4Ah and 7Ah alarm batteries?
The amp-hour (Ah) rating tells us how much power the battery can supply over time – a 7Ah battery provides roughly 75% more backup time than a 4Ah battery when the power goes out, with 7Ah batteries typically providing 4-8 hours of backup while 4Ah batteries give us 3-5 hours. We must use the exact amp-hour rating specified for our alarm panel because the charging circuit is calibrated for that specific battery size and using the wrong size can cause charging problems or inadequate backup time.
Keeping Your Home Protected: Final Thoughts on Alarm Battery Maintenance
We’ve covered everything we need to know about changing our home alarm battery, from recognizing warning signs to installing the replacement and troubleshooting problems. This straightforward maintenance task protects our homes during those critical moments when we need security most – during power outages when vulnerability increases.
Regular battery maintenance doesn’t just keep our system running; it gives us peace of mind knowing our security system will work when it matters. We’ve invested good money in alarm systems to protect our families and property, and spending $20-40 every few years on fresh batteries is cheap insurance compared to the alternative. Those middle-of-the-night beeps aren’t just annoying – they’re our system begging for the attention it needs to keep doing its job.
Taking 15 minutes to swap out a battery ourselves saves us over $100 in technician fees while teaching us how our security system actually works. We’re now empowered to handle this essential maintenance without waiting for appointments or paying someone else to do something we can easily do ourselves. Our homes stay protected, our wallets stay happy, and we’ve gained valuable knowledge about the systems keeping our families safe every single day.